 |
 |
 |
Helping You To Achieve ©™

|
![]()
Helping You To Achieve ©™
|
|
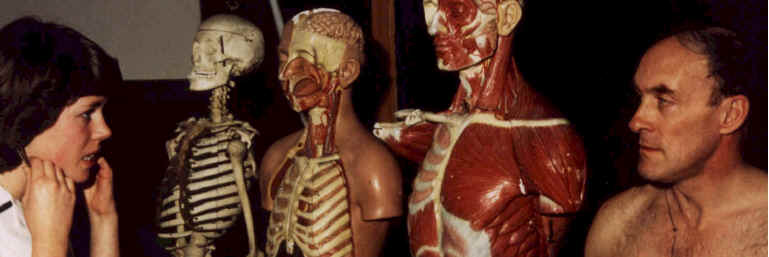
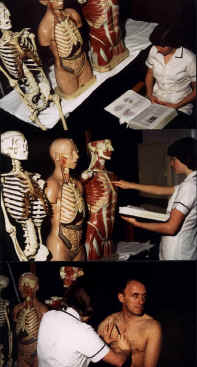
Draw on the surface of the Thorax with a skin marking pencil the projected outline of the parietal pleura of the lung given a model in the anatomical position with side lighting and a time limit of five minutes for each side. Note : Left and Right parietal pleura are different
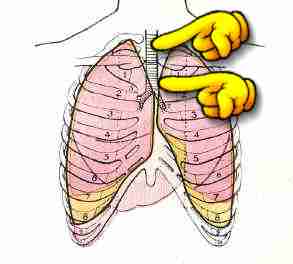
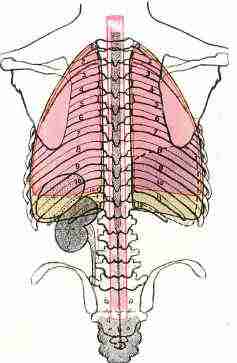
Objective 192 - Criteria to be demonstrated for the Right parietal pleura 1. Palpate and mark the tip of the 7th Cervical Spinous Process. (Objective No 161) 2. Mark a point 2.5cms lateral to the tip of the 7th Cervical Spinous Process. 3. Mark a point 3.5cms above the junction of the medial one third and mid-third of the shaft of Clavicle. (Note: The Clavicular attatchment of Sterno-Cleido Mastoid) 4. From point No 3 draw a line to the Sternoclavicular Joint. 5. Identify the Jugular notch and palpate downwards on the manubrium of the Sternum for about 5cms to the Sternal angle which is marked by a horizontal ridge in the Median plane. 6. Draw a line from the Sternoclavicular joint to a point where the Sternal angle is cut by the Median Plane. 7. Identify the second Costal Cartilage where it articulates with the Sternal angle and count down to the Sixth Costal Cartilage and mark. 8. Identify and mark the midpoint of the Shaft of Clavicle. 9. Draw a vertical line from No 8 on the Thorax to cut the-Body of the eigth rib and mark this point. 10. Identify the Axillary space and surface mark the mid-Axillary line to where it cuts the Iliac Crest. 11. Count down and mark the Tenth intercostal space. 12. Draw a vertical line from the Inferior Angle of Scapula downwards to where it cuts the eleventh intercostal space. 13. Mark a point 2cms lateral to the tip of the 12th Thoracic Spinous process. Connect all the above points with a final line from No 14 to No 2. Note : The inferior border of the pleura lies below the body of the 12th rib.
Objective 192 - Criteria to be demonstrated for the Left parietal pleura
Draw with a surface marking pen, the projected outline of the Parietal Pleura of the Left Lung on a model in the Anatomical position with a time limit of five minutes.
1. Request model to depress both Shoulders to bring Clavicles to a horizontal plane. 2. Mark the Clavicular attachment of the left Sterno-cleido-mastoid muscle. 3. Mark a point 3.5 cms superior to the Clavicular attachment of the left Sterno-cleido-mastoid muscle. 4. Surface mark the left Sterno-clavicular joint line. 5. Draw the line of the Median plane where it cuts the Sternal Angle. 6. Surface mark the left 4th Costo-sternal junction. 7. Draw a line to represent the left Lateral Vertical Plane on the anterior surface of the Thorax. 8. Surface mark the positions of the left 5th, 6th and 7th Costal cartilages. 9. Draw a vertical line to indicate the position of the left Mid-axillary line on the surface of the Thorax. 10. Draw a vertical line cutting the Inferior angle of the left Scapula on the surface of the Thorax. 11. Identify and surface mark the position of the body of the 12th rib. 12. Identify and mark the left lateral border of the Erector Spinae muscles. 13. Draw a line from step 3 downwards and medially to cut the Sterno-clavicular joint. 14. Continue the line from step 4 to step 5 and mark where the Median plane cuts the Sternal angle. 15. The line of the Left Parietal Pleura and Right Parietal Pleura converge slightly to the left of the Median plane contained in step 2. 16. Continue the line vertically downwards to the 4th Costal Cartilage surface marked in step 6. 17. Continue the line downwards and obliquely outwards crossing the 5th, 6th and 7th Costal Cartilages as surface marked in step 8. 18. Draw the line to meet the left Lateral vertical line at the 8th Costal Cartilage. 19. Continue the line to the Mid-Axillary line where it cuts the body of the 10th rib. 20. Draw the line from step 7 to the body of the 12th rib at the lateral border of the Erector Spinae Muscles. 21. Finally draw a vertical line upwards from step 8 to meet the original starting point 3.5cms above the Clavicular attachment of the left Sterno-cleido- mastoid muscle on a level with the Spinous process of C7 2.5cms from the Median plane. Draw with a surface marking pen, the projected outline of the Parietal Pleura of the Left Lung on a model in the Anatomical position with a time limit of five minutes.
|
Service ProvisionBronze. Students may take up a ,'Free start up ' package consisting of 100 of the behavioural objectives and criteria based on common questions asked in Living Anatomy. These are available free of charge on this Website. Silver. Students may buy a copy of the book "Surface and Living Anatomy" (ISBN: 0 7234 3261 9) which comes with a CD Rom (Windows PC format) containing 230 objectives which includes the 100 behavioural objectives contained in the Bronze Service. Gold "Helping you to Achieve" Contact Information
|