 |
 |
 |
Helping You To Achieve ©™

|
![]()
Helping You To Achieve ©™
|
|
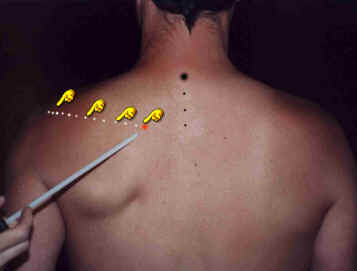
Draw on the posterior surface of the Thorax with a skin marking pen, the projected outline of the Spine of Scapula with the model in the anatomical position with side lighting and a time limit of one minute.
Objective No 1 - Criteria to be demonstrated. There are two ways to achieve this : First Method 1. Identify by palpation the Spine of the 7th Cervical Vertebrae using the criteria contained in (Objective No 161). 2. Count down from the tip of the 7th Cervical Vertebrae, identifying the tip of the 1st Thoracic Spinous process, the tip of the 2nd Thoracic Spinous process and the tip of the 3rd Thoracic Spinous process. 3. Flexion of the Cervical and upper Thoracic areas of the Vertebral column will help with identification. 4. Keep two finger tips in contact with the skin, one maintaining contact with a confirmed anatomical feature and the second finger tip identifying the next bony structure. 5. The 3rd Thoracic Spinous process lies opposite the base of the Spine of Scapular . 6. The base of the spine of scapular is positioned approximately 5cms from the midline at the level of the 3rd Thoracic Spinous process. 7. Placing the tip of the index on the base of the Spine of Scapular, trace the prominent bony spine which feels like a ridge of bone, upwards and laterally where it terminates as a flattened plateau of bone named the Acromion Process which forms the highest bony point of the Shoulder Girdle. 8. With the model in the Anatomical position, request the model to place the Dorsum of the right hand, the elbow joint fully flexed, on the posterior aspect of the Thorax in the midline between both Scapulae. 9. The Inferior Angle of the Scapula becomes visibly prominent and can be identified by palpation opposite the spinous process of the 7th Thoracic Vertebra. 10. The Vertebral border of the Scapular can be traced to the base of the Spine of Scapular and on to the Superior Angle of Scapula.
Second Method 1. Request the model to place the palmar surface of one hand on the Upper fibres of the Trapezius muscle (Objective No 29) of the opposite side. 2. The palmar surface of the fingertips should point downwards and be in contact with the posterior surface of the Thorax. 3. Immediately below the resting fingertips,a distinct bony ridge can be palpated which moves when the Shoulder girdle is moved. 4. Palpate this prominent bony ridge from its vertebral base upwards and outwards in a lateral direction to a flat subcutaneous bony area where it terminates. 5. This flat subcutaneous bony area is the Acromion process and represents the highest bony point of the Shoulder. 6. The distinct and prominent bony ridge running from medial to lateral, upwards and outwards is the Spine of Scapula which terminates in the Acromion process.
|
Service ProvisionBronze. Students may take up a ,'Free start up ' package consisting of 100 of the behavioural objectives and criteria based on common questions asked in Living Anatomy. These are available free of charge on this Website. Silver. Students may buy a copy of the book "Surface and Living Anatomy" (ISBN: 0 7234 3261 9) which comes with a CD Rom (Windows PC format) containing 230 objectives which includes the 100 behavioural objectives contained in the Bronze Service. Gold "Helping you to Achieve" Contact Information
|